 Ariel Corporation has been manufacturing gas-compression equipment at its Mt. Vernon, Ohio, plant, for 45 years, and is among that market’s innovators with compression technology. The operators there take pride in world-class manufacturing processes and product designs, as well as the quality of their products and processes. Maintaining a reputation as “the world standard” for gas compression systems requires Ariel to design products that can be manufactured, installed, and serviced easily and effectively.
To design a world-class compressor, nothing can be left to chance. Because the compressor is at the center of an integrated system that includes the driver, cooler, piping, and other components, Ariel designs each element carefully in order to integrate the compressor with the driver and the package system — and to lower the lifetime cost of ownership. Maximum driver power and efficiency and precise piston stroke coordinated with valve design for optimum valve efficiency and life are all part of the design integrity. Every design considers the feasibility of patterns, castings, and machining. Integrating the technical design of the compressor with an understanding of manufacturing technology has been a key to Ariel’s success.
Ariel machines numerous parts ranging from just a few pounds up to 20,000 lb. These are steel or cast gray or ductile iron components. Machined parts such as compressor connecting rods may be 8¼ in., center-to-center, and weigh about 13 lb; or they may be up to 23 in., center-to-center, and weigh almost 300 lb. Crossheads vary in size from 8 lb (6 in. overall×6 in. diameter) up to 800 lb. (19 in. overall×17 in. diameter). The largest single part Ariel machines is over 13 ft long, 5 ft wide, and 4 ft tall.
Previously, Ariel technicians used hand gauging to verify smaller products, while larger products were verified directly on the machine tools (mostly CNC equipment). These were time-consuming methods and, more importantly, they tied up the machine for inspection rather than production. It was a waste of capacity and money. Also, an important, overlooked point was that by using the machine tool to inspect its own work, there was no independent verification of the readings.
 “At Ariel, individual machinists are always expected to produce good products, but there are some geometric features that they can’t measure themselves at the machine tool,” said quality analyst Ned White. “At manufacturing’s request, the quality department instituted a program where we would verify parts off of certain machines. Under this program, we can provide a complete dimensional report in about 30 minutes. Previously, this was something that was not easily done.”
In addition to this in-house verification, Ariel checks certain dimensions on every frame that is machined outside of their main plant in Mt. Vernon. This may be as many as 30 frames per week, and at over two hours per frame this was a full-time job for at least two people.
To implement its new program Ariel considered adding additional hand gauging, height gauges, or even more people. They also considered a traditional CMM, but that was cost-prohibitive and impossible to accommodate based on the available space. They were looking for a device with a large measuring envelope (for those 20,000-lb parts), and the tolerances they hold ruled out any laser scanning equipment.
Flexibility, portability, ease-of-use, and accuracy were the final deciding factors for Ariel. After looking at a couple of different articulating arm manufacturers, Ariel settled on the FARO Technologies line of portable CMMs products.
What Ariel found in FARO was a full family of solutions that suits specific needs throughout their operation. Each device they have implemented provides them with a true 3D picture of what they produce, and gives them a good — and independent — 3D verification of their machined parts. It’s easy now to take coordinates and compare those readings to a CNC program. This allows for very simple corrections and offsets in the machining process.
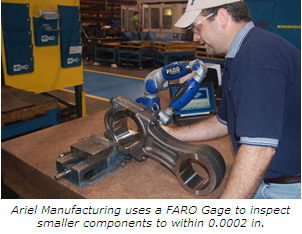
The first solution implemented by Ariel was the FARO Gage, a small, accurate up to 0.0002 in., articulating arm. They use two GagePlus units to pass/fail product in manufacturing. These units are used directly in the machining cells. Because of the similarity in design and the flexibility of the software, Ariel is able to use one custom tool for all of their connecting rods and crossheads.
The tool has been used to assist in troubleshooting dimensional issues, too. By verifying and reporting dimensions of a feature after each step of machining, Ariel is able to pinpoint where and when in the manufacturing process a potential error could be made that would result in scrap. Not only is the measurement process fast, the FARO Gage gives technicians geometric information that they could not obtain any other way.
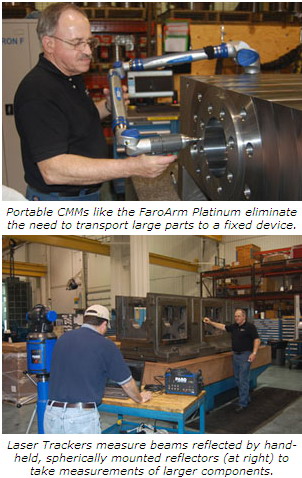
Ariel also adopted a FaroArm® Platinum that they use to measure “just about everything.” Specifically, Ariel’s quality-control inspectors use the FaroArm to verify both incoming components and products made internally. For the internal parts, the arm is used to verify features that otherwise could not be checked – such as GD&T and larger dimensions where hand tools lose accuracy. They also use the FaroArm to assist with the verification of machine tool adjustments as well as to track any changes in machine accuracy. Parts produced on certain machines are completely checked and verified at set intervals. This provides Ariel with a good history of what a particular machine tool is doing over time and helps them better plan preventive maintenance and repairs.
For parts that are too large to be easily measured with an arm, the inspectors use the FARO Laser Tracker. The Laser Tracker is used by maintenance technicians, too, for machine alignments and large dimensional verifications. As part of the product verification system using the FaroArm, the Tracker is a quick way to improve the consistency and accuracy of their machine tools.
“For us, the fact that both CMM solutions can run on the same software is a great feature,” said Mr. White. “It dramatically speeds up training and allows us to use pre-set inspection programs from either device interchangeably. Many of our parts are of a similar design – usually just different sizes – and so we can use the same program to measure all sizes within a family of parts. For instance, we can use the same program to measure six different frames – some with the FaroArm and the larger ones with the Tracker – all using the same program.”
One particular feature of the FaroArm that is especially beneficial to Ariel is its wireless capability through Bluetooth®. With a laptop and the extended-use battery of the FaroArm, technicians can literally climb into the machines and verify parts in production without having to take them off of the fixtures, or worrying about tripping over external cords or knocking over the computer. Frequently, Ariel inspectors need to check just a few features on a part during the machining process, and the wireless capability allows them to leave the part fixed in the machine for additional verification and saving them repeat setup time.
Ariel is leading the world in the development and utilization of new technology. It was an early adopter of internationally recognized quality programs, and both their design and manufacturing processes conform to the highest quality standards. So, it is not altogether surprising that Ariel’s implementation of the technologies provided by FARO was quick.
In less than a week, Ariel was able to implement the Gage fully in its production processes. Training of individual users in basic operations takes less than 15 minutes. The training to build custom tools can be done in less than an hour. Implementation of the FaroArm took less than a month and the Laser Tracker in even less time since it uses the same software as the FaroArm (FARO’s CAM2® Measure X).
Ariel uses its CMMs every day in production. They use their FaroArm several hours per week, while the Laser Tracker is used at least once a week for part inspection, and several hours a month for machine alignments. Checking connecting rods used to take up to 30 minutes using traditional hand gauging. Using the FARO Gage has dropped the time for that task to under three minutes – a 90% savings. Since 2009, Ariel has saved about 260 hours of inspection time using the Gage. Checking the dimensions of every frame that is machined outside the operation used to take over two hours per frame. Using the FaroArm, this time was reduced to just 20 minutes – an 85% reduction in time. Now, these verifications are a job that can be done in a couple of hours each day by one person, freeing valuable man-hours that can be used better on other projects and tasks. Smaller frames were checked using a height gauge and hand tools, and would take over three hours to finish. These frames can weigh about 2,500 lb and had to be rolled on their side to check the features completely. Not only was this time consuming, it was sometimes dangerous. The FaroArm allows Ariel to check these same parts in just twenty minutes – a 90% reduction in time. The larger frames used to take a full 10-hour shift to check using a height gauge and hand tools, and that still did not provide Ariel a complete picture of the part. Using the FARO Laser Tracker, this can be done in just two hours – an 80% time-savings, and that includes laser setup and warm up. “Using FARO has saved Ariel countless hours of inspection time,” according to White. “The capabilities these devices offer really have no counterpart with other CMM equipment and provide us functions we did not have prior to acquiring them. Our process inspection time has been greatly reduced using FARO. “In addition, the ability to save the inspection reports has allowed us to go back and review the initial measurement of some parts where we might have had issues during assembly. FARO has allowed us to focus our troubleshooting and best efforts in the right direction,” he concluded.